ysyx-linux
Port-Linux-on-NEMU
About
这篇文章是从笔者的笔记整理而来, 比起“讲义”更像“博客” ,目前有许多东西都还没有完善(特别是linux driver的部分)
在笔者尝试给NEMU移植kernel的时候, 感到完全无从下手(也没发现CommandBlock老师的教程),过程中踩了非常多的坑,于是总结了这篇笔记
虽然大家更加建议的roadmap是PA3,4->xv6->quardstar->linux-nommu->linux-mmu,但笔者觉得,如果我们给NEMU加上了完备的基础设施(difftest/trace/gdb),NEMU比QEMU更能帮助我们理解kernel启动的流程,完全可以PA3,4->(xv6->)linux-mmu
也可以参考
Proposal: Let’s build this Document together!🚀
发现问题/有好的建议欢迎提PR!
PR is always welcome here.
打开方式
建议先完成:
NEMU PA全部内容- 阅读
Opensbi和RISCV Spec Volume II, ch 1,2,3,10
由于笔者的NEMU的架构是riscv32,这篇文章的很多Tips可能只适合与riscv32架构,但是从生态的角度来讲,riscv64gc的生态会非常好,建议大家优先考虑实现riscv64gc
如果NEMU实现的足够优雅是可以通过menuconfig来切换rv32/rv64,但显然我没有😭
启动linux kernel 和启动nanos-lite的区别
Nanos-lite的实现不是很规范,比如在M-mod下启用虚拟内存,也没有实现S-Mod- 从硬件(
NEMU)的角度来说,Linux的规模更大,如果实现有问题更能体现出来 Nanos-lite是我们自己写硬件+软件,如果硬件有BUG可以在软件上加一个workaround()
启动 linux kernel 的多种方式
fsbl->opensbi->linuxfsbl->opensbi->u-boot->linuxuboot-spl->opensbi->u-boot->linux
在 nemu 上都不用实现 fsbl, 所以可以选择最简单的方法: opensbi->linux
可以参考
Opensbi repo里面的fpga/arine
About OpenSBI
“硅基大陆的宪法仍在,城邦却铸造着各自的货币”
提供标准SBI接口、隔离硬件访问
1.虽然有统一的标准, 但是不同RISC-V硬件实现的差异还是太多了, 比如用多少个 pmp 寄存器, 相关硬件的早期初始化都不一样, opensbi就是负责启动早期的工作的
2.抽象和安全 当计算机世界一个东西变得足够复杂的时候, 就创建一个抽象层来简化它
所以启动带 mmu 的 kernel 一定要用 opensbi
- A platform-specific firmware running in M-mode and a bootloader, a hypervisor or a general-purpose OS executing in S-mode or HS-mode.
- A hypervisor running in HS-mode and a bootloader or a general-purpose OS executing in VS-mode.
所以 uboot 是干什么的?
我的理解:更高级的支持->支持命令行/从 tftp 服务器上下载文件, 更复杂的硬件和安全支持.
但显然目前在 nemu/npc 上不需要
Opensbi 的多种模式
FW_PAYLOAD把下一个阶段的内容直接打包进opensbi生成的binary里面FW_JUMP直接跳转到一个固定的地址FW_DYNAMIC从上一个 booting-stage 获取信息 (比如上一个 stage 已经把opensbi和系统准备好了)
在 nemu 上用 ` FW_PAYLOAD ` 是最省力的
阅读手册
为啥不去看看 rv 手册呢 (Volume II, ch 1,2,3,10)
(Reserved Writes Preserve Values, Reads Ignore Value)WPRI(Write/Read Only Legal Values)WLRL(Write Any Values, Reads Legal Values)WARL
Opensbi 在启动的过程中就会尝试给很多 csr 寄存器写数值, 然后再读取出来,
- 如果寄存器没有实现, 就会抛出
illegal instruction fault, 这时候跳转到Opensbi自己的异常处理程序里面, 如果这个 csr 是必须的, 那么 opensbi 会抛一个异常停下来, 如果不是必须的, 那么接下来就不使用这个寄存器继续 - 如果硬件某些寄存器的位没有实现, Opensbi 会不使用这个位
csr 寄存器可以通过索引的高四位判断权限/RW 权限等等->硬件实现就简单了
mstatus/sstatus & sie/mie 的某些位应该是硬件上的相同 bit, 根据手册定义
A restricted view of mstatus appears as the sstatus register in the S-level ISA.
思考: 我们需要实现哪些 csr?
如果目标仅仅是<我要把 kernel 正常跑起来>的话
- 首先排除所有拓展
- 排除和安全相关的
csr - 其实可以直接启动
opensbi-FW_JUMP模式, 把opensbi的输出调好, 只要能正常跑到跳转的地方就说明csr已经实现的差不多了
更强的基础设施
实现 difftest
阅读 Spike 源码
重要的文件
processor.h/state_t:里面包含了 spike 的状态 (全部的寄存器)../difftest.cc/difftest_init: 里面包含了 spike 的初始化参数->只实例化 16 个pmpregionscsrs.cc:里面有各种 csr 寄存器的行为
比较有意思的事情
- 取指的时候先 fetch->dedode->放进 icache 里面, 利用程序的局部性来实现加速.
- Decode 使用了查找表
- 对于各种异常(非法指令,page fault)等使用了try-catch处理
- 某些寄存器的一些位没有完全实现,对这些寄存器的读写有 MASK (在
csrrs.cc中) - 指令的实现在
riscv/insns/*.h中
对访问不存在的csr寄存器的时候
回想起之前手册的内容, 访问没有实现的 CSR 寄存器的时候会抛出 Illegal Instruction Fault,
我们有很多方法来处理
- 和访问设备的处理方式一样,把nemu的寄存器复制进Spike,但这样不太好
- 让Spike在访问nemu未实现的寄存器的时候同步抛一个
illegal instruction fault
那么我们就需要修改Spike的代码了
在spike中,所有 csr 指令都会首先 get_csr, 如果 csr 不存在就抛异常, 所以只要在不打算实现的 csr 上抛出一个异常就行了
bool difftest_dut_csr_notexist = false;

// Note that get_csr is sometimes called when read side-effects should not
// be actioned.  In other words, Spike cannot currently support CSRs with
// side effects on reads.
reg_t processor_t::get_csr(int which, insn_t insn, bool write, bool peek)
{
  if(difftest_dut_csr_notexist) {
    difftest_dut_csr_notexist=false;
    printf("spike:stepping DUT(nemu,npc)'s unimplemented csr\n");
    throw trap_illegal_instruction(insn.bits());
  }
  auto search = state.csrmap.find(which);
  if (search != state.csrmap.end()) {
    if (!peek)
      search->second->verify_permissions(insn, write);
    return search->second->read();
  }
  printf("spike:stepping REF(spike)'s unimplemented csr\n");
  // If we get here, the CSR doesn't exist.  Unimplemented CSRs always throw
  // illegal-instruction exceptions, not virtual-instruction exceptions.
  throw trap_illegal_instruction(insn.bits());
}
WARN: 不要使用 ref_difftest_raise_intr来实现上述功能
ref_difftest_raise_intr是用来实现中断的,只会设置异常号跳转到异常处理程序
但是illegal instruction fault存在”副作用”,会对多个csr寄存器做修改,所以不要使用下面的方案
//不要使用下面的方案!
void difftest_step_raise(uint64_t NO) {
//step
  ref_difftest_exec(1);
//rasie intr
  ref_difftest_raise_intr(NO);
//set step
  difftest_skip_ref();
  ref_difftest_regcpy(&cpu, DIFFTEST_TO_REF);
}
实现 difftest_csr
- 修改
difftest_init的 api, 传入需要 diff 的 csr 的索引数组 - 每次diff的时候只传输需要diff的csr
- 借助宏定义,就可以实现在nemu实现一个csr的同时自动给这个csr做diff
- 宏真好用 ()
接入 gdb
使用mini-gdbstub项目可以很轻松在nemu里面接入gdb-server
有待解决的问题
如果仔细测试mini-gdbstub的实现,你会发现虽然mini-gdbstub虽然实现了stepi函数,但gdb并不会调用它!gdb的每次step都是在下一条指令的位置打一个断点,然后continue,这会导致对ecallstep的话有问题,无法step进异常处理程序.
猜测是init的时候给gdb传的参数有问题.
进阶操作
给gdb传送target description文件来实现对csr的读取
具体参考往期分享会
结合tmux实现自动分屏
tmux split-window -h -p 65 "riscv64-unknown-linux-gnu-gdb -ex \"target remote localhost:1234\" $(ELF)"
自动读取符号表
ELFS :='-ex \"set confirm off\" -ex \"symbol-file ${PWD}/opensbi/build/platform/nemu/firmware/fw_payload.elf\" -ex \"add-symbol-file ${PWD}/linux/vmlinux\" -ex \"set confirm on\"'
使用socket加速
参考该项目github pr#5
添加trace
为了更加深入理解linux kernel的行为,可以考虑添加:
- 异常/中断的
trace - 设备(
PLIC)的trace MMU的traceecall的trace
我自己的技术选型
非常不建议完全按照我的方法走!
一开始在感觉给 NEMU “移植” ` linux ` 的过程中用NEMU来模拟硬件的行为是不是怪怪的
所以我选择了不改动 nemu 的实现 (比如 ` uart ) ,而是给 opensbi / linux` 写驱动 (但这样会花很多时间)
然后写 linux-uart 驱动的时候发现自己小看了 linux kernel 的复杂程度 (:-
其实 nemu 的 uart 可以轻松修改兼容标准的UART16550,具体RTFSC.
移植 Opensbi
主要参考了 opensbi/docs/platform_guide.md ,但是,如果 nemu 模拟了 UART16550 的话, 其实更推荐使用 Opensbi 官方提供的 Generic Platform ,根据官网介绍可以直接按照设备树来自行加载驱动
创建一个新的 platform
从 platform/template 里面复制然后稍作修改
设置 Makefile 的参数
PLATFORM_RISCV_XLEN = 32
PLATFORM_RISCV_ABI = ilp32
PLATFORM_RISCV_ISA = rv32ima_zicsr_zifencei
PLATFORM_RISCV_CODE_MODEL = medany

FW_DYNAMIC=n

FW_JUMP=y
FW_TEXT_START=0x80000000
FW_JUMP_ADDR=0x0
这里可以先使用JUMP模式,把 FW_JUMP_ADDR 设置成 0, 如果执行 mret 之后跳转到了 0 就说明 ` opensbi ` 执行完了,后续我们跑linux的时候再使用PAYLOAD模式。
你接下来需要在开启difftest的情况下正常跑到mret的地方.
编译:
make CROSS_COMPILE=riscv64-unknown-linux-gnu- PLATFORM=nemu
生成的二进制文件: ./build/platform/nemu/firmware/fw_jump.bin
后续开启PAYLOAD以后二进制文件就是
fw_payload.bin了
让 opensbi 正常输出字符 (适配 nemu-uart )
主要参考 int uart8250_init(unsigned long base, u32 in_freq, u32 baudrate, u32 reg_shift,u32 reg_width, u32 reg_offset) 这个函数的代码, 主要要调用 sbi_console_set_device sbi_domain_root_add_memrange 这两个函数, 然后自己实现一个 nemu-uart 的驱动, 这样就能看到字符的正常输出了
static int uart_getch(void)
{
	return -1;
}
static void uart_putch(char ch)
{
	char *serial_base = (char *)0xa0000000 + 0x00003f8;
	*serial_base	  = ch;
}

static struct sbi_console_device my_uart = { .name	   = "nemu_uart",
					     .console_putc = uart_putch,
					     .console_getc = uart_getch };

/*
 * Platform early initialization.
 */
static int platform_early_init(bool cold_boot)
{
	if (!cold_boot)
		return 0;

	sbi_console_set_device(&my_uart);
	return sbi_domain_root_add_memrange(0x10000000, PAGE_SIZE, PAGE_SIZE,
					    (SBI_DOMAIN_MEMREGION_MMIO |
					    SBI_DOMAIN_MEMREGION_SHARED_SURW_MRW));
	return 0;
}
如果实现比较正常, 那么你应该能看见输出信息 (要么是 Opensbi 的欢迎界面, 要么是 Opensbi 报错某个寄存器没有实现)
system_opcode_insn: Failed to access CSR 0x104 from M-mode
sbi_trap_error: hart0: trap0: illegal instruction handler failed (error -1)
阅读 Opensbi 的源码
如果提前看了 opensbi 的汇编代码, 会发现 csr_read_num 等函数里面有很多 csr 寄存器, 但其实不一定都要实现
这是因为:在启动过程中,Opensbi会先注册一个特殊的中断处理程序,然后对很多个寄存器尝试写入,如果这个寄存器硬件没有实现,那么就会跳转到它的中断处理程序里面,如果这个寄存器是必须的,那Opensbi就会抛出一个异常,如果是可选实现,那么就会继续执行,并在之后不使用这个寄存器
可以参考下面的代码:
sbi_csr_detect.h/csr_read_allowed//csr_write_allowed检测寄存器是否支持读写!sbi_hart里面hart_detect_features会检测平台支持的寄存器是否存在等, 它包括异常处理, 允许后续恢复现场
向 nemu 添加更多的寄存器
我不选择”一口气把所有手册中定义的 csr 全部实现”因为感觉会陷入名为<细节>的黑洞:要实现很多非必须的csr的功能
听北京基地的某位大佬说香山的 nemu 的 csr 实现的非常巧妙, 感兴趣可以参考, 但我没看 (:-
宏魔法
在实现过程中可能要频繁修改 csr 寄存器的列表, 我希望通过宏定义实现相对统一的寄存器管理: 在头文件中添加了一个寄存器之后:
- 自动为寄存器的索引生成一个常量
Difftest的时候会自动比较这个寄存器gdb/sdb能读取/显示/打断点这个寄存器 所以我使用了define和undef组合, 让一个宏有多种展开方式
#define CSR_LIST \
  GenCSR(MHARTID, 0xf14) \
  GenCSR(MSTATUS, 0x300) \
  ...

  #define GenCSR(name, paddr) \
  static const uint32_t NEMU_CSR_V_##name = paddr; \
  static const uint32_t NEMU_CSR_##name = paddr;
	CSR_LIST
  #undef GenCSR
...
  static const char *difftest_csr_name[] = {
#define GenCSR(NAME,IDX) #NAME,
  CSR_DIFF_LIST
#undef GenCSR
};
...

#define GenCSR(name, paddr) \
  "<reg name=\"" #name "\" bitsize=\"32\" type=\"int\" regnum=\"" #paddr "\" />\n"
  ...
位域
typedef union {
  struct {
    unsigned int       : 1;
    unsigned int SSIE  : 1;
    unsigned int       : 1;
    unsigned int MSIE  : 1;
    unsigned int       : 1;
    unsigned int STIE  : 1;
    unsigned int       : 1;
    unsigned int MTIE  : 1;
    unsigned int       : 1;
    unsigned int SEIE  : 1;
    unsigned int       : 1;
    unsigned int MEIE  : 1;
    unsigned int       : 1;
    unsigned int LCOFIE: 1;
    unsigned int       : 18;
  } bits;
  uint32_t value;
} mie_t;
#define NEMU_mie ((mie_t *)(&cpu.csr[NEMU_CSR_MIE]))

//使用
NEMU_mie->bits.STIE = xxx;
NEMU_mie->value = xxx;
当然这种写法有问题(Unspecified behavior(参考标准附录J)),根据标准定义,struct中的bit-filed必须被打包进同一可寻址单元的相邻域中(如果大小合适)但是,
- 同一单元之中的位域分配顺序(从高到低还是从低到高,由实现来决定)
- 跨单元的行为由实现来决定
(From
ISO/IEC 9899:2024 6.7.3.2.13) An implementation may allocate any addressable storage unit large enough to hold a bit-field. If enough space remains, a bit-field that immediately follows another bit-field in a structure shall be packed into adjacent bits of the same unit. If insufficient space remains, whether a bit-field that does not fit is put into the next unit or overlaps adjacent units is implementation-defined. The order of allocation of bit-fields within a unit (high-order to low-order or low-order to high-order) is implementation-defined. The alignment of the addressable storage unit is unspecified.
寄存器的细节
指令运行执行过程中当前正在执行的指令直接触发的异常一般是同步异常(Synchronous Exception), 要立刻阻塞当前的指令执行流, 并且指令本身不应该产生其他的副作用。
所以word_t isa_raise_intr(word_t NO, vaddr_t epc) didn’t work!
当然我们可以用一个参数来表示是否成功, 但是,考虑这一个指令
INSTPAT("??????? ????? ????? 001 ????? 11100 11", csrrw , I, R(rd)=CSRR(imm&0xfff,s);CSRW(imm&0xfff,s)=src1);
可能会发生什么呢?
- 访问的 csr 不存在, 抛出 illegal instruction fault
- 没有权限访问 csr, 抛出 illegal instruction fault
- 取指过程中出现 page fault, 抛出Instruction page fault
对于 L/S, 还可能会抛出
Load page fault/Store/AMO page fault
这么多不同的地方会抛出这么多不同的错误, 这也太不”优雅”了! 所以 Spike 选择用 try-catch, 但是我们的 c 没有😭
回忆 15-213 ,老师似乎讲过一个 none-local-jump 的东西, 允许程序直接从一个很深的调用栈里面直接跳出跳转到某个位置, 查询资料, 找到了 set-jump 函数, 虽然有性能的损失,但也能满足我们的需求。
int isa_exec_once(Decode *s) {
  int jump_value = setjmp(memerr_jump_buffer);
  if(jump_value!=0){
    return exception_exec(jump_value,s);
  }
  ...
}
向LinuxKernel进发!
在kernel.org下载linux内核源码
可以大致读一下Linux的启动流程
linux 内核
6.x开始menuconfig默认不显示riscv32的编译选项了,需要勾选(Allow configurations that result in non-portable kernels),我拉取5.15的版本
配置kernel
[!NOTE] BTW, 可以按
/键来搜索menuconfig的选项 (虽然很符合直觉但似乎挺多人不知道hh)
建议先从 defconfig 改动, 而不是 tinyconfig 改动, 先把 kernel 跑起来再说
虽然提供了具体的配置方案,但还是建议大家自己好好看看kernel 有哪些配制
make ARCH=riscv CROSS_COMPILE=riscv32-unknown-linux-gnu- (defconfig/menuconfig/tinyconfig)
基于defconfig的参考配置方案
//设置initramfs的文件((可以先不填)如果不填kernel会默认拿一个空文件)
→ General setup->Initial RAM filesystem and RAM disk (initramfs/initrd) support(填自己的Initramfs source file(s))
→ Platform type ->Base ISA (RV32I)
//关闭了这个才能关闭compressed instructions
→ Boot options -> UEFI runtime support (n)
→ Platform type->Emit compressed instructions when building Linux  (n)
→ Platform type->FPU support(n)
→ Device Drivers → Character devices → Serial drivers -> NEMU uartlite serial port support (y)(自己写的驱动)
//在vmlinux里面加入调试信息,提升调试体验
→ Kernel hacking → Compile-time checks and compiler options->Compile the kernel with debug info (y)
还是想从tinyconfig开始修改?
- 你需要尽量启用完整的debug支持,特别是
earlycon,printk - 你需要启用
uart和plic的驱动
我们最小需要什么?
- 串口输出支持
- 中断支持(for
uart输入) - 一些debug支持(
printk,early-console等) - Riscv32IMA架构
一个基于tinyconfig实现最小化配制的参考方案
//启用printk的支持(用于打印log)
→ General setup → Configure standard kernel features (expert users) -> Enable support for printk(y)
//启用并选择一个initramfs的内核文件
→ General setup->Initial RAM filesystem and RAM disk (initramfs/initrd) support(y)(填自己的Initramfs source file(s))
→ Platform type ->Base ISA (RV32I)
→ Boot options -> UEFI runtime support (n)
→ Platform type->Emit compressed instructions when building Linux  (n)
→ Kernel hacking → printk and dmesg options->Show timing information on printks
→ Kernel hacking → Compile-time checks and compiler options -> Compile the kernel with debug info (y)
→ Device Drivers → Character devices ->Enable TTY (y)
→ Device Drivers → Character devices ->Enable TTY -> Early console using RISC-V SBI (y)
→ Device Drivers → Character devices ->Enable TTY ->  NEMU uartlite serial port support (y)
→ Executable file formats->Kernel support for scripts starting with #! (y)
→ Device Drivers → IRQ chip support->SiFive Platform-Level Interrupt Controller (y)
linux kernel的打开方式
基础设施
- 可以配置一个好用的
clangd,支持代码跳转/宏展开等功能 - NEMU接入gdb,边调试边理解
- 觉得每次传参数太麻烦了?->写一个Makefile!
- 让gdb可以调试Spike的代码->默认情况下,直接使用gdb是无法调试作为difftest-ref的spike的,这是因为在
nemu/tools/spike-diff/Makefile里面有一个替换指令sed -i -e 's/-g -O2/-O2/' $@
编译kernel
make ARCH=riscv CROSS_COMPILE=riscv32-unknown-linux-gnu- -j $(nproc)
会编译出:
./vmlinuxkernel的elf文件./arch/riscv/boot/Image二进制文件,作为Opensbi的payload
来自虚拟内存的问候NO.1
将软件TLB(Translation Lookaside Buffer)填充设置为可选项->在nemu中为了简化就可以不实现TLB了
The initial RISC-V paged virtual-memory architectures have been designed as straightforward implementations to support existing operating systems. We have architected page table layouts to support a hardware page-table walker. Software TLB refills are a performance bottleneck on high-performance systems, and are especially troublesome with decoupled specialized coprocessors. An implementation can choose to implement software TLB refills using a machine-mode trap handler as an extension to M-mode.
来自虚拟内存的问候NO.1
如果你在这时候使用objdump尝试反编译vmlinux的内容,你会发现kernel被链接到了0xC0000000的位置,这和我们将要把代码放置的位置不同!
先别急,这是正常现象,如果你的riscv模拟器实现正确,kernel完全可以正常运行
为什么?不妨加一个trace自行探索试试看?
hint:linux内核中异常!=错误,只有无法处理的异常==错误
统计 kernel 需要多少 csr
为啥不先看看 kernel 访问了那些寄存器呢?
但注意:有一个 time (timeh) 寄存器反汇编出来的指令是 rdtime/rdtimeh
首先 Objdump 出 vmlinux 的内容, 然后可以写一个简单的 Python 脚本来统计总共访问了哪些 csr 寄存器
import re
import sys

def find_csr_registers(disassembly):
    csr_pattern = re.compile(r'.*csr[a-z]{1,2}\t.*')
    csrr_pattern = re.compile(r'.*csrr\t.*')
    csr_registers = set()

    for line in disassembly.split('\n'):
        match = csr_pattern.search(line)
        csrr_match = csrr_pattern.search(line)
        if csrr_match:
            result=re.split(r'[,\t]+',line)[-1]
            csr_registers.add(result)
        elif match:
            result=re.split(r'[,\t]+',line)[-2]
            csr_registers.add(result)

    return sorted(csr_registers)

if __name__ == "__main__":

    with open("./result.txt", 'r') as f:
        disassembly = f.read()

    csr_list = find_csr_registers(disassembly)

    print("Used CSR registers:")
    for csr in csr_list:
        print(f"- {csr}")
来自真实系统的 tradeoff
在真实的系统中, 时钟一般不会设计成一个寄存器/csr 的形式, 因为会有多个 hart 同步/关机/动态调频的问题, 一般设计成 MMIO
来自 riscv-spec
Accurate real-time clocks (RTCs) are relatively expensive to provide (requiring a crystal or MEMS oscillator) and have to run even when the rest of system is powered down, and so there is usually only one in a system located in a different frequency/voltage domain from the processors. Hence, the RTC must be shared by all the harts in a system and accesses to the RTC will potentially incur the penalty of a voltage-level-shifter and clock-domain crossing. It is thus more natural to expose mtime as a memory-mapped register than as a CSR.
再次提醒:基础设施
kernel 的报错输出依赖关键csr寄存器的实现正确,但是csr实现的细节很繁杂,没有difftest的话很可能会存在某些地方实现错误!
gdb大法好
gdb可以极大地加强你的调试体验,你不会喜欢一直使用printk调试法/ebreak调试法的
ebrak调试大法(别学)
asm volatile (
    "mv a0, %0\n\t"    // 将 start 的值加载到 a0 寄存器
    "mv a1, %1\n\t"    // 将 end 的值加载到 a1 寄存器
    "ebreak"           // 执行 ebreak 指令
    :
    : "r"(start), "r"(end) // 输入操作数:将 start 和 end 传递给寄存器
    : "a0", "a1"       // 声明 a0 和 a1 寄存器会被修改
);
gdb好用的地方之一:可以读取函数调用的backtrace和参数,如果你的earlycon输出不正常也可以使用gdb来调试
#2  0x8091d2d8 in panic (fmt=fmt@entry=0x81410b78 <payload_bin+12651384> "\0014RISC-V system with no 'timebase-frequency' in DTS\n")
    at kernel/panic.c:443
检查编译内核的时候是否添加了调试新息
→ Kernel hacking → Compile-time checks and compiler options -> Compile the kernel with debug info
打开这个选项以后gdb的调试体验会极大增强(可以读函数参数,可以对着源代码调试)
来自虚拟内存的问候NO.1
kernel启动早期会开启MMU,MMU的实现会导致gdb远程调试出现bug(无法正确扫描内存导致info src出现异常),所以需要特殊处理,有两个方法:
- 在gdb扫描内存的时候执行
page table walk - (不推荐,地址有问题可能会触发
kernel的BUG_ON宏或者导致设备树读取失败)修改linux kernel的Makefile,把PAGE_OFFSET设置成和加载地址一样的数值,这样可以保证kernel的虚拟地址和物理地址相等
测试你的基础设施
用gdb远程调试给kernel打一个断点,看看是否能够正常停下来,info src能不能正常定位到源代码
输出第一条信息
回想我们笔记本的linux启动的时候会有很多调试信息,在linux出现问题的时候能给我们很大的提示,但是,serial驱动的初始化往往在kernel初始化的很晚的阶段,那怎么看早期的log呢?
当我们想到这个问题的时候,大概率有人想过了,这就是OpenSBI提供的earlycon功能,如果启用了这个功能以后,kernel的输出会经过一次ecall以后跳转到Opensbi后然后由Opensbi输出
启用kernel的printk的支持
建议检查一下printk的选项有没有开,如果printk没有开那么不会输出log!
Kernel hacking-> printk and dmesg options

→ General setup → Configure standard kernel features (expert users) -> Enable support for printk
启用kernel的earlycon
确保在menuconfig里面勾选了earlycon功能,并且给kernel传递了earlycon=sbi作为启动参数(可以通过设备树传递,也可以临时在menuconfig里面指定( → Boot options->Built-in kernel command line ))
[ 0.000000] Linux version 5.15.178 (seeker@miLaptop) (riscv64-unknown-linux-gnu-gcc (GCC) 13.2.0, GNU ld (GNU Binutils) 2.41) #138 SMP Sat Feb 15 16:19:35 HKT 2025
来自虚拟内存的问候NO.2
遇到了问题正在阅读linux kernel mmu的源代码?
但是如果阅读kernel源代码,会发现一个奇怪的逻辑
void __init create_pgd_mapping(pgd_t *pgdp,
				      uintptr_t va, phys_addr_t pa,
				      phys_addr_t sz, pgprot_t prot)
{
	pgd_next_t *nextp;
	phys_addr_t next_phys;
	uintptr_t pgd_idx = pgd_index(va);

	if (sz == PGDIR_SIZE) {
		if (pgd_val(pgdp[pgd_idx]) == 0)
			pgdp[pgd_idx] = pfn_pgd(PFN_DOWN(pa), prot);
		return;
	}
...
}
不理解?该去翻一下手册了(10.3.2. Virtual Address Translation Process)
Kernel 跑着跑着 hit good (bad) trap 了?
如果查看kernel的汇编发现指令中混入了一个 ebreak!
为什么会 call ebreak: 因为有 BUG_ON 等等宏触发了, 通常是 Kconfig/Makefile 有问题
BUG_ON((PAGE_OFFSET % PGDIR_SIZE) != 0);

BUG_ON()
#define BUG_ON(condition) do { if (unlikely(condition)) BUG(); } while (0)
#define __BUG_FLAGS(flags) do {					\
	__asm__ __volatile__ ("ebreak\n");			\
} while (0)

#define BUG() do {						\
	__BUG_FLAGS(0);						\
	unreachable();						\
} while (0)
asmlinkage void __init setup_vm(uintptr_t dtb_pa)
{
...
	/* Sanity check alignment and size */
	BUG_ON((PAGE_OFFSET % PGDIR_SIZE) != 0);
	BUG_ON((kernel_map.phys_addr % PMD_SIZE) != 0);
...
}
设备树
设备树主要是描述硬件平台设备组成和配置的数据结构,它的核心作用是将硬件信息从内核代码中分离,实现硬件描述与系统软件的解耦,从而提升系统的可移植性、可维护性和灵活性,一般由bootloader加载进内存并传递给kernel,也可以直接打包进kernel.
x86架构并没有设备树,x86架构通过ACPI等协议自动探测硬件连接(当然也有
riscv-ACPI)
第一次学设备树会觉得很抽象, 其实可以直接额参考文档/其他设备的 example
设备”树”有很多种写法, 感觉 json 很像, 但也有区别
可以参考
大概需要有什么:
             ┌─────────────────────────────┐
             │         Root Node           │  / {
             ├─────────────────────────────┤
             │  #address-cells = <1>       │
             │  #size-cells    = <1>       │
             │  compatible = "seeker_nemu" │
             └─────────────┬───────────────┘
                           │
    ┌────────────────┬─────┴───────────────────┬───────────────────┬──────────────────┐
    │                │                         │                   │                  │
┌───▼──────┐  ┌──────▼───────────┐    ┌────────▼──────────┐ ┌──────▼─────────┐  ┌─────▼───────────┐
│ choosen  │  │      cpus        │    │  plic0@0xC000000  │ │ uart@a00003f8  │  │ memory@80000000 │
├──────────┤  ├──────────────────┤    ├───────────────────┤ ├────────────────┤  ├─────────────────┤
│ bootargs │  │timebase-frequency│    │     compatible    │ │ reg=0xA00003F8 │  │ reg=0x80000000  │
│          │  │                  │    │     riscv,ndev    │ │ status=okay    │  │   -0x87FFFFFF   │
└──────────┘  └──────┬───────────┘    │        reg        │ └────────────────┘  └─────────────────┘
                     │                │interrupts-extended│
              ┌──────▼────────┐       └────────────┬──────┘
              │   / cpu@0     │                    │
              ├───────────────┤                    │
              │   compatible  │                    │
              │  device_type  │                    │
              │    status     │                    │
              │   riscv,isa   │                    │
              └─────────┬─────┘                    │
                        │                          │
                     ┌──▼──────────────────┐       │
                     │      cpu0_intc      │       │
                     ├─────────────────────┤       │
                     │  #interrupt-cells   │       │
                     │     compatible      │       │
                     │interrupt-controller ◄───────┘
                     │                     │
                     └─────────────────────┘
来自虚拟内存的问候NO.3:opensbi 是如何把设备树地址传递给 kernel 的
如果你尝试调试kernel中访问设备树的部分,你会发现:kernel访问设备树时候访问的是0x3e200000附近的地址
这个地址是怎么来的呢?
根据手册规定,设备树地址应该放在a1寄存器传递给kernel
如何确定这块地址是不是设备树->可以扫描内存看看魔数对不对
/* Save hart ID and DTB physical address */
	mv s0, a0
	mv s1, a1
...
#ifdef CONFIG_BUILTIN_DTB
	la a0, __dtb_start
#else
	mv a0, s1
#endif /* CONFIG_BUILTIN_DTB */
	/* Set trap vector to spin forever to help debug */
	la a3, .Lsecondary_park
	csrw CSR_TVEC, a3
	call setup_vm
之后我们追踪一下这个变量(head.s), 发现传递给了 ` setup_vm ,然后会映射这片内存到0x3e200000`附近
检查设备树是否被正常加载
你需要给这里打一个断点,来检测设备树是否读取成功
status = early_init_dt_verify(params);
if (!status)
	return false;
一个未解之谜
如果你有任何想法,pr/issue is always welcomed!
如果你的设备树传递的地址没有对齐,可能会在这里设置错误的dtb_early_va,我没搞清楚为什么不需要显式对齐
这里建议按照Opensbi官方仓库里面的fpga/ariane的makefile来配置FW_PAYLOAD_FDT_ADDR,FW_PAYLOAD_OFFSET,FW_PAYLOAD_ALIGN等参数
kernel的代码:
dtb_early_va = (void *)fix_fdt_va + (dtb_pa & (PMD_SIZE - 1));
我认为需要显式对齐的代码:
dtb_early_va = (void *)(fix_fdt_va & ~(PMD_SIZE-1) ) + (dtb_pa & (PMD_SIZE - 1));
思考: 设备树是如何解析调用驱动的?
可以参考 drivers/of/fdt.c, 里面的 early_init_dt_scan_nodes,在这里面初始化内存,把设备树解析到内存里面,之后的driver_init的时候再根据设备树里面的compatable子段匹配驱动,然后调用对应的probe函数
void __init early_init_dt_scan_nodes(void)
{
	int rc = 0;

	/* Initialize {size,address}-cells info */
	of_scan_flat_dt(early_init_dt_scan_root, NULL);

	/* Retrieve various information from the /chosen node */
	rc = of_scan_flat_dt(early_init_dt_scan_chosen, boot_command_line);
	if (!rc)
		pr_warn("No chosen node found, continuing without\n");

	/* Setup memory, calling early_init_dt_add_memory_arch */
	of_scan_flat_dt(early_init_dt_scan_memory, NULL);

	/* Handle linux,usable-memory-range property */
	early_init_dt_check_for_usable_mem_range();
}
这里应该只解析了设备树,初始化设备还在后面,但是内存(页表是在这里初始化的)
设备树映射虚拟内存的逻辑:
虚拟内存的映射也是根据设备树来的,在设备树读取到内存节点的时候, 会调用 early_init_dt_add_memory_arch 之后调用 memblock_add 存储地址进 memblock.memory 以便之后读取
Linux 适配 nemu-uart 驱动!
FIXME: 由于kernel的复杂性,这里有非常多的疏漏和没讲清楚的地方
主要参考 linux 内核 driver-api/serial/driver
同时可以参考 linux 内核的 uart-lite 的驱动,因为从代码行树来看的话,uart-lite是代码最少的uart驱动
启用uart(nemu-uart/uartlite)驱动的位置在 tinyconfig→ Device Drivers → Character devices->tty->xxx
添加 nemu-uart 驱动
- 创建
nemu-uart.c文件 - Kconfig 添加项
- Makefile 添加项
obj-$(CONFIG_NEMU_UART) += nemu-uart.o menuconfig里面勾选驱动
kernel驱动的组成
Linux 驱动主要包含几个结构体:
console控制台设备的接口uart_ops定义uart的函数集合uart_driver表示一个uart的驱动程序uart_port表示一个具体的uart端口platform_driver实现平台总线上的一个设备驱动
注册驱动
module_init宏会注册模块的初始化函数,如果这个驱动被编译进kernel(比如我们的nemu-uart驱动),就会在kernel启动的时候被do_initcalls()调用
module_init(nemu_uart_init);
uart驱动的基本流程
- 内核初始化的时候调用
do_initcalls() - 调用
do_one_initcall()调用每个注册的init函数 - 调用nemu-uart注册的
nemu_uart_init(初始化函数) - 调用
platform_driver_register注册驱动(nemu_uart_platform_driver结构体) - 经过一系列调用调用
driver_probe_device(),尝试把driver和某个device绑定 - 再经过一系列函数调用进入
nemu_uart_platform_driver注册的nemu_uart_probe()函数 probe函数获取内存资源/获取中断资源/映射内存/注册驱动/初始化端口/添加自旋锁
static struct uart_driver nemu_uart_driver = {
	.owner = THIS_MODULE,
	.driver_name = DRIVER_NAME,
	.dev_name = "ttyNEMU",
	.major = TTY_MAJOR,
	.minor = 2472,
	.nr = 1,
};
主要的参考资料
Uart-lite
向文件系统进发!我们需要一个 initramfs
更多资料可以参考
之前的内容跑到这里就说明成功了,接下来就需要一个文件系统了,
#2  0x8091d1f4 in panic (
    fmt=fmt@entry=0x81410748 <payload_bin+12650312> "No working init found.  Try passing init= option to kernel. See Linux Documentation/admin-guide/init.rst for guidance.") at kernel/panic.c:443
文件系统是操作系统给我们提供的又一层抽象.由于NEMU中我们尚未实现磁盘,所以最好的方法是打包一个initramfs
参考linux文档,如果不指定路径,内核会使用一个空的initramfs
真实系统的initramfs:只是启动过程中的一部分,bootloader负责把kernel和initfs加载进内存然后启动kernel,kernel会判断initfs的类型(initrd/initramfs), 一般initramfs只是作为在真正的根文件系统被挂载之前的一个临时文件系统,里面存放一些被编译成”可加载的内核模块”的驱动, 这样也可以简化kernel的实现,因为磁盘的实现有多种多样(可能是软件RAID, LVM, NFS…这些都需要特殊的步骤去挂载, ),但内存是简单统一的. 再之后会调用
pivot_root()来卸载initramfs并切换到真正的根文件系统
需要修改kernel的menuconfig,打开initramdisk的支持,并把我们之后打包的initramfs添加进来:
-> General setup -> Initial RAM filesystem and RAM disk (initramfs/initrd) support
首先,我们需要创建linux的目录结构
mkdir --parents /usr/src/initramfs/{bin,dev,etc,lib,lib64,mnt/root,proc,root,sbin,sys,run}
创建控制台设备
sudo mknod rootfs/dev/console c 5 1
init 进程
系统启动后由内核创建的第一个用户空间进程(PID 为 1)。它是所有其他进程的父进程或间接父进程,负责初始化系统环境、管理系统服务和守护进程的生命周期。
我们的目标是在nemu上启动一个简单的kernel就行了,所以init进程主要的工作就是启动shell
测试用户空间程序是否能正常加载
由于init进程是内核启动加载的第一个进程,我们只要测试一下init能不能正常加载执行就可以了
可以先用c写一个死循环程序,用工具链静态编译以后打包进initramfs里面,之后给kernel传递init=xxx参数,让kernel运行init
riscv32-unknown-linux-gnu-gcc -static -o init init.c
诶,page fault了?
hint:异常!=错误
difftest又报错了?
该读文档了!
The Svade extension: when a virtual page is accessed and the A bit is clear, or is written and the D bit is clear, a page-fault exception is raised.
riscv页表的脏位检查是允许硬件维护,同时也使用一个M-mode拓展来允许软件维护
在nemu中就直接抛异常让软件来实现就行了
参考Spike的代码:
reg_t ad = PTE_A | ((type == STORE) * PTE_D);

if ((pte & ad) != ad) {
  if (hade) {
    // set accessed and possibly dirty bits.
    pte_store(pte_paddr, pte | ad, addr, virt, type, vm.ptesize);
  } else {
    // take exception if access or possibly dirty bit is not set.
    break;
  }
}
编译交叉工具链
之前编译Opensbi和kernel的时候其实没有链接glibc,现在在编译用户程序的时候就需要一个带glibc的工具链支持了,可以自行编译riscv-gnu-toolchain
因为--enable-multilib会默认用rv32gc来编译标准库,如果传递了 --enable-multilib 可能会导致编译出的标准库包含 c 拓展的指令,从而导致最后静态链接的elf文件包含压缩指令
可以先用静态链接的方式编译init/busybox
虽然在大多数情况下可以正常运行,但是静态编译链接glibc是非常不推荐的参考StackOverflow
推荐的编译选项:
./configure --prefix=/opt/riscv --with-arch=rv32ima --with-abi=ilp32
make linux
有关newlib和musl库
[!WARNING] 这一段未经验证,可能有问题
不建议尝试使用musl和newlib
截至目前,newlib上游只适配了x86-linux
来自newlib官网:
Now linux is a different animal. It is an OS that has an extensive set of syscalls. If you look in the newlib/libc/sys/linux directory, you will find a number of syscalls there (e.g. see io.c). There is a set of basic syscall macros that are defined for the particular platform. For the x86, you will find these macros defined in newlib/libc/sys/linux/machine/i386/syscall.h file. At the moment, linux support is only for x86. To add another platform, the syscall.h file would have to be supplied for the new platform plus some other platform-specific files would need to be ported as well.
[!IMPORTANT] 根据musl的configure,可能有riscv的支持 感兴趣可以尝试用clang+muslc (TODO:docs here)
截至目前,musl 上游没有支持riscv-linux
来自musl官网
Use it on Linux x86 (32/64), ARM (32/64), MIPS (32/64), PowerPC (32/64), S390X, SuperH, Microblaze, OpenRISC
虽然有riscv-newlib和riscv-musl的分支, 不过也是archieve的状态了,也没必要使用没有官方支持/停止维护的东西
有关工具链的”目标三元组”
编译生成的工具链的名称有riscv32-unknown-linux-gnu-xxx,riscv32-unknown-elf-xxx,musl-xxx等这些其实包含了Target Triplet的东西,可以通过gcc -dumpmachine查看
Target Triplet的格式是machine-vendor-operatingsystem,详细信息可以自行STFW
其中riscv32-unknown-elf-xxx使用Newlib的工具链,不包含riscv-linux系统相关的代码(比如linux的ecall)
Initramfs 的打包
可以先写一个死循环来测试, 然后再 initscript
init要有执行权限!
(cd initramfs && find . | cpio -o --format=newc | gzip > ../initramfs.cpio.gz)
编译 busybox
make CROSS_COMPILE=riscv32-unknown-linux-gnu- ARCH=riscv  CONFIG_PREFIX=/root/initramfs meuconfig
make CROSS_COMPILE=riscv32-unknown-linux-gnu- ARCH=riscv  CONFIG_PREFIX=/root/initramfs install
编译busybox过程中头文件<byteswap.h>未找到?
busybox里面有platform-spec的适配代码,通过检查gcc 的 System-specific Predefined Macros
在toolchain的config 里面有参数 --enable-linux,如果make linux的话会默认选中这个参数,但如果强行传–enable-linux就链接到glibc库里面去了
/* ---- Endian Detection ------------------------------------ */

#include <limits.h>
#if defined(__digital__) && defined(__unix__)
# include <sex.h>
#elif defined(__FreeBSD__) || defined(__OpenBSD__) || defined(__NetBSD__) \
   || defined(__APPLE__)
# include <sys/resource.h>  /* rlimit */
# include <machine/endian.h>
# define bswap_64 __bswap64
# define bswap_32 __bswap32
# define bswap_16 __bswap16
#else
# include <byteswap.h>
# include <endian.h>
#endif
创建init脚本
需要先开启kernel的init脚本的支持
→ Executable file formats->Kernel support for scripts starting with #!
具体可以参考各路wiki,在这里我们可以简化,直接启动一个sh就行了
实现串口的输出
如果之前一切顺利,那应该能看见kernel运行了init脚本的内容,并且最终执行了/bin/sh
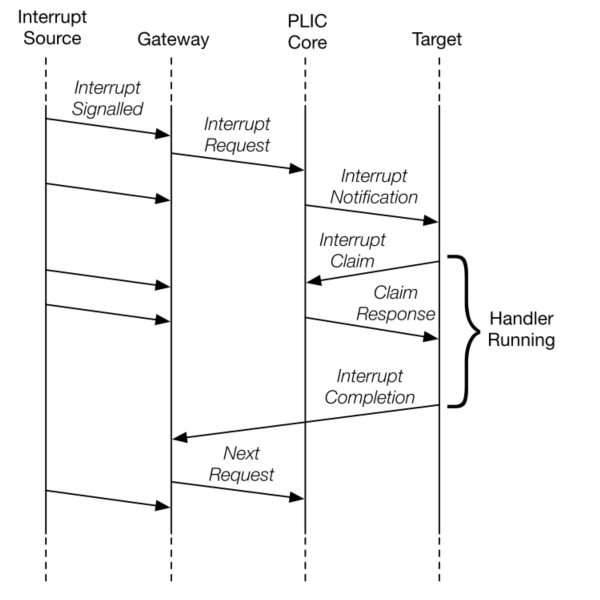
之后我们当然想要输入,支持输入的话就要中断的支持了,在riscv中,外部的中断需要一个统一的中断控制器来管理,这个中断控制器可以协调多个外部中断源, 实现分配优先级, 抢占, 屏蔽, 路由, 完成通知,…这就是PLIC(Platform-Level Interrupt Controller)
实现更强的终端支持
在nemu中,我们直接把输出打印到控制台,但是log也会打印到控制台,输入/输出/Log全部混在一起并不是一个明知的选择,所以我采用了伪终端(pseudoterminal),创建一个伪终端,通过screen链接这个伪终端来和nemu交互
写了一个最小化实现的例子
一个未解之谜
如果没有一个client(比如screen)连接上这个pyt消费掉master(nemu)存进去的数据的话,输出的内容会在下一次读取的时候读取出来,我就让ptyinit的时候等待client链接(详细参考我的例子)
PLIC 的适配
参考:
PLIC就不写驱动了,还是老老实实实现sive的PLIC吧
需要修改uart的设备树,声明中断源和连接plic
uart: uart@a00003f8 {
	compatible = "seeker,nemu_uart";
	reg = <0xa00003f8 0x1>;
	interrupts = <1>;         // 使用PLIC中断源1(可随便定义,但需<=riscv,ndev-1)
	interrupt-parent = <&plic0>;  // 关联到PLIC
	status = "okay";
};
PLIC&CLINT
PLIC&CLINT是两个设备,所以需要另外一根线连到处理器核,所以核内也有一个中断控制器(相信在写设备树的时候也发现了)
这个核内的中断控制器是必须要实现的, 不然plic驱动就加载不起来
hartid = riscv_of_parent_hartid(node);
if (hartid < 0) {
	pr_warn("unable to find hart id for %pOF\n", node);
	return 0;
}
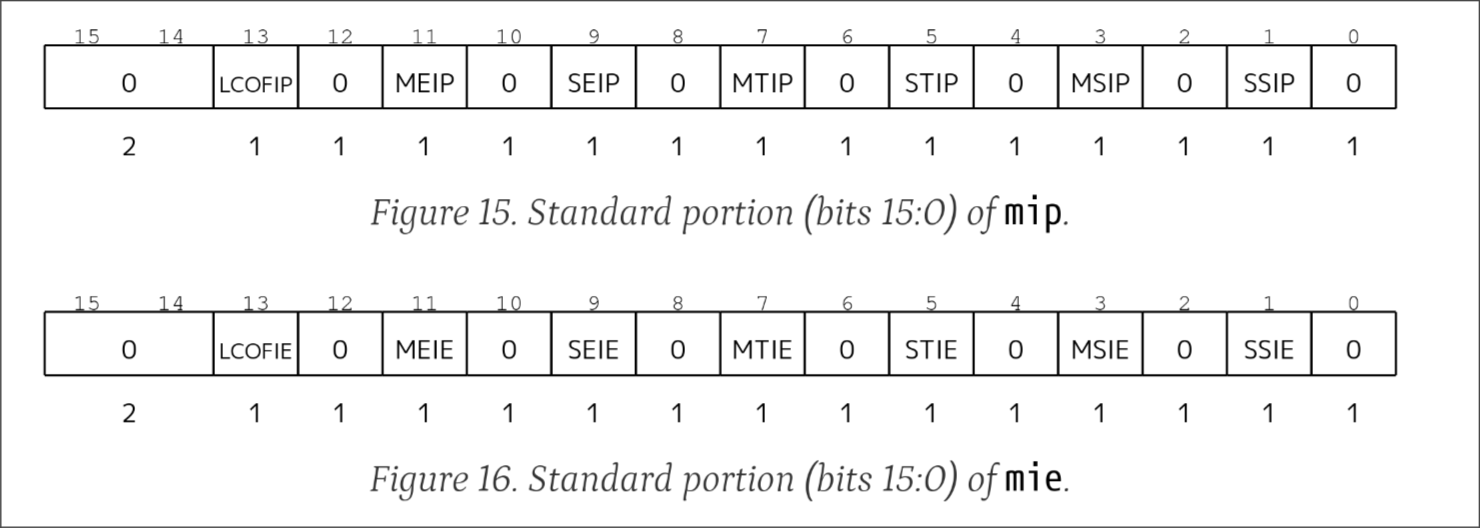
根据riscv手册,优先中断的优先级如下
Multiple simultaneous interrupts destined for M-mode are handled in the following decreasing
priority order: MEI, MSI, MTI, SEI, SSI, STI, LCOFI.
这里的缩写分别代表:
MEI (Machine External Interrupt)MSI (Machine Software Interrupt)MTI (Machine Timer Interrupt)SEI (Supervisor External Interrupt)SSI (Supervisor Software Interrupt)STI (Supervisor Timer Interrupt)LCOFI (Local Custom Offload Interrupt)
这里的主要设计原则:
- 更高特权级的中断需要先处理
- 外部中断优先于内部中断(外部设备(比如网络I/O可能有更加严格的时间要求))
- 软件中断优先于内部定时器中断(定时器中断一般用于时间片流转,而软件中断用于处理器间通讯,可能需要更快的响应),但软件中断在
mip的低四位,允许单条csr指令(csrrwi等)直接修改
注册中断
要让kernel知道中断发起的时候应该调用哪个处理函数,就需要我们自己注册中断了
其实kernel文档提醒了: Probe 的时候获取中断号 (这里要判断一下是否正常, 否则等到
platform_get_irq的时候会 fail)
nemu_uart_port.irq = platform_get_irq(pdev, 0);
然后 startup 的时候注册中断
int ret = request_irq(port->irq, nemu_uart_irq,
		      IRQF_TRIGGER_RISING, "nemu_uart",
		      port);
这样当中断到来的时候kernel就会调用nemu_uart_irq这个函数了
具体参考文档
PLIC设备的实现
给 plic 加一个 trace, 发现读写的地址有:
0xc002080->Hart 1 M-mode enables
0xc002084->same area
0xc201000->Hart 1 M-mode priority threshold
0xc000004-> source 1 pirority
阅读手册, 可以知道大概的流程是
- Uart中断传送到PLIC
- PLIC设置pendingbit
- 等待时机抛出异常(M/S external interrupt)
- linux 进行异常处理 (跳转到PLIC驱动)
- claim 读取
claim/complete reg(反回0或最高记别的中断) - linux进行跳转到对应的回调函数进行处理
- 结束以后 写
claim/complete reg如果成功就清除pengding bit
实现PLIC的行为就很简单了
异常处理的细节
其实没有完全实现正确可能也能跑,因为目前 difftest 的框架没有办法diff到中端是否应该被响应->我们difftest的difftest_raise_intr(NO)只会发起一个intr并立刻响应,并不会检查这个中断是否被屏蔽了;
所以实现的时候要仔细阅读手册
中断是交给M-Mode 处理还是S-Mod处理->应该仔细阅读手册有关medeleg & mideleg的部分
默认情况下会把所有异常/中断都交给 M-Mod 处理, 然后让 M-mod 的程序来选择是自己处理还是交给S-Mode的操作系统来处理, 但是为了提高性能, 可以把某一些中断/异常委托给 S-Mod (timer/pagefault/plic)
在mstatus中有全局中断使能,mie & mip有对细分的中断使能
为什么不跑一个发行版呢?
看看远方的 Riscv64 吧!
- “32-bit architectures are being killed off one-by-one, not being added.” (from debian mail-list)
- “What needs to be done: Get riscv32 running somehow (fails due to bugs in qemu user mode emulation)” (from gentoo wiki)
- fedora wiki : not even mentioned yet.
如果发新版支持,可以直接chroot进不同架构的rootfs参考,然后直接执行apt install 大致的步骤
当然rv32也有社区支持,参考
迈向更安全的大厦
PMP
启动linux的时候不需要实现PMP的功能
pmp<n>cfg: L0A | XWR L: locked->(addr&entry) O:reserved A: Access Type
Permissions-error:
- Instruction access fault
- load access-fault
- Store access-fault
AccessType:
- 0-关闭
- 1-TOR (TOP of Range),TOR 模式通过两个相邻的
pmpaddr寄存器定义一个连续的地址范围- Matches
pmaddr(i-1)<y<pmaddr(i), 如果大于则无效
- Matches
- 2->NA4 (Naturally aligned four-byte region),定义一个 4 字节对齐 的极小内存区域
- 3->NAOT (Naturally aligned power-of-two region, ≥8 bytes)NAPOT 模式定义一个 2 的幂次方大小且自然对齐 的内存区域->看末尾有多少个 1?